The Short Version
- You are buying two things: a tool and a stream of parts. The tool is capital; it has a defined life, and the quote should separate it from the piece price so the two can be compared independently.
- Annual volume and program life drive the tool decision more than any other input, because they determine mold class, cavitation, and steel. Quoting a volume you do not expect to buy produces a tool priced for a program you are not running.
- The SPI mold classification describes the tool's construction and expected cycle life, ranging from Class 101 for multi-million-cycle production to Class 105 for prototypes. Naming a class in the RFQ makes quotes comparable in a way that a description of the part never will.
- Removing steel from a tool is straightforward and adding it back is not, so a feature that may need to grow should start small. This is the single most useful design habit in the category, and it has no equivalent in machining or fabrication.
- Resin is a specification, not a family name. Grade, filler, additive package, color method, and any regrind allowance all change the part, the cycle, and sometimes the tool.
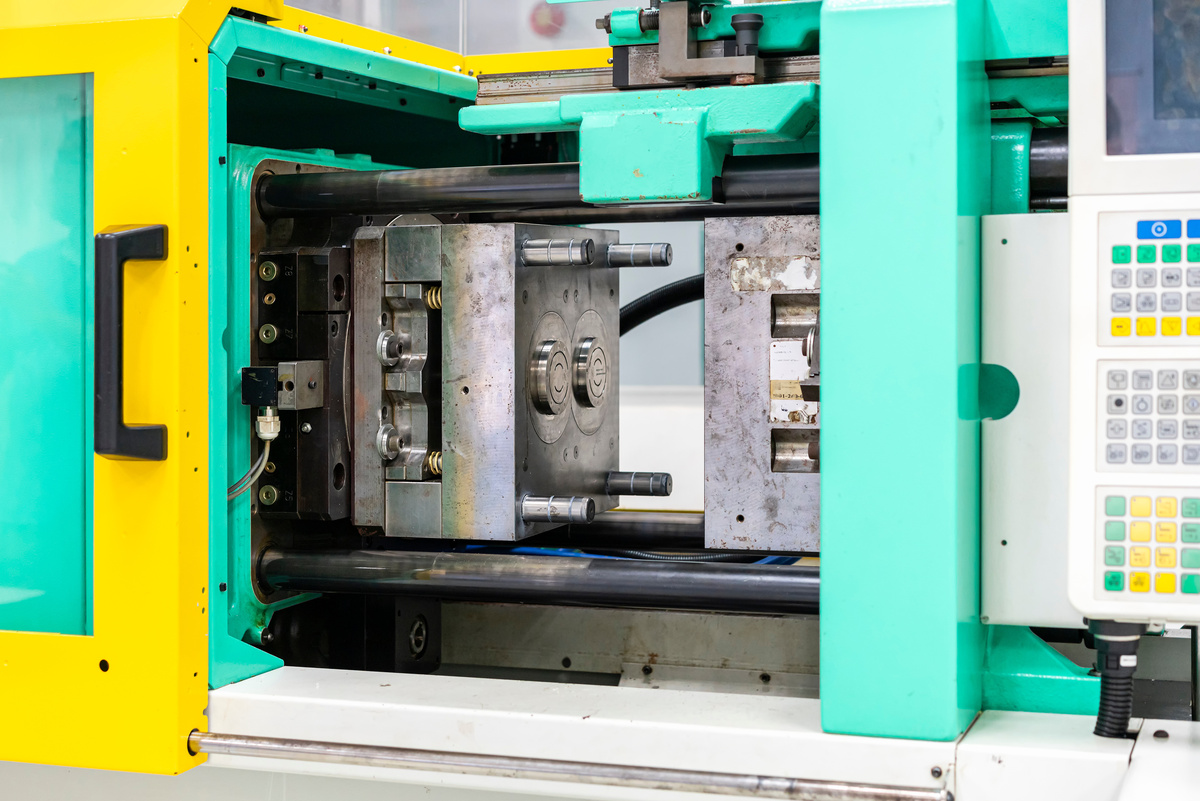
A machining or fabrication RFQ is for buying parts. If the first ones are wrong, the next ones can be different. Injection molding does not work that way. Before any part exists, someone cuts a steel tool to a geometry derived from your model, and that tool then defines what you can buy for as long as the program runs. Changing the part after the tool is cut can range from minor rework to a new tool, and which one it is depends on details most buyers do not know are decisive when they send the files.
That is why this guide spends as much time on the tool as on the part. The sequence matters too: the volume decision constrains the tooling decision, the tooling decision constrains what the part can be, and the resin decision touches both. Getting them out of order is how a program ends up with a tool that is either too cheap to last or too expensive to justify. What follows walks through the sequence from the first decision to reading the quotes.
01. Why molding quotes go wrong
Five failure patterns account for most of the difficulty, and all of them start in the request.
- Volume is stated as a hope rather than a plan. The tool is then built for that number, and the program either wears out a tool that is too light for it or amortizes a tool that is too heavy across parts that never materialize.
- The part is designed as though it were machined. Uniform wall thickness, draft, and the absence of undercuts are not styling preferences in this process; they determine whether the part can be made at all and at what cycle time.
- Family names resin. Suppliers then quote different grades with varying shrinkage, cycle times, and sometimes tool requirements, so the prices are not comparable.
- Tooling scope is undefined. Quotes arrive covering different mold classes, different cavitation, and different levels of texture and finish work, and the cheapest is frequently the one that omitted the most.
- Ownership and maintenance are left to the purchase order boilerplate. This surfaces years later, when the program has to move, and it turns out nobody agreed who owns the steel.
02. Start with volume, because it sets the tool
Before anything else, establish four numbers and be honest about the confidence behind each.
- Annual volume, at launch and at maturity, since these are frequently different and the tool has to serve both.
- Total program life, in years and in parts. This is the figure the mold class is chosen against.
- Release pattern: steady, seasonal, or a large launch quantity followed by replenishment. Cavitation depends on how many parts are needed at once, not on how many are needed in total.
- How firm the forecast is, and what happens to the program if it is wrong in either direction.
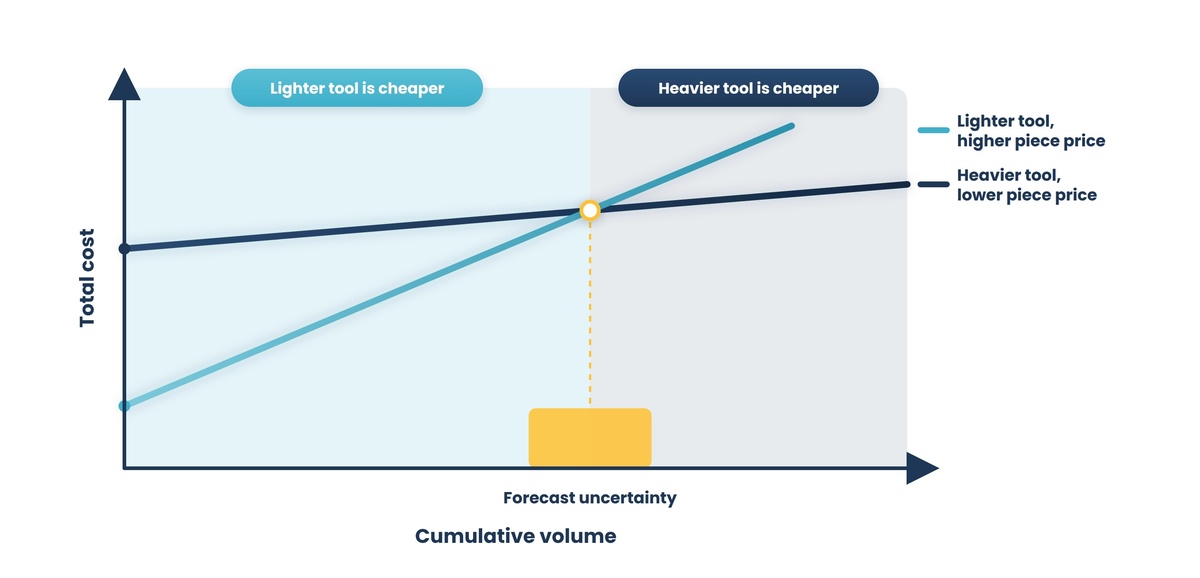
That last question matters more than buyers expect. A tool built for high volume and fed a low one is capital sitting idle. A tool built for low volume and pushed hard wears, and its dimensions drift as it does, which shows up as parts that were in tolerance last year and are marginal now. Where the forecast is genuinely uncertain, say so in the RFQ and ask suppliers to propose a staged approach: a lower-class tool or lower-cavitation now, with a defined path to a production tool later. A molder who has been told the truth about uncertainty can design around it. One who has been given a confident number will build to it.
Prototype, bridge, and production are three purchases
Prototype tooling exists to prove the part, often in aluminum, with a short life and a fast build. Bridge tooling covers the gap between prototype and production, producing real parts in the real resin at moderate volume while the production tool is built. Production tooling is the long-term asset. Deciding which of the three you are buying is the first thing a molder needs to know, and asking for a quote without saying invites all three answers at once.
03. Part files and what the drawing must carry
Send a 3D model and a 2D drawing. The model defines geometry; the drawing states requirements, and on a molded part the drawing carries several things the model cannot express.
- Which dimensions are critical and which are reference, since a molded part has many dimensions and only some of them matter. This distinction is what lets a molder place variation where it does no harm.
- The tolerance standard being applied and the class within it. General tolerances for molded plastic parts are defined in ISO 20457, published by the International Organization for Standardization, and in DIN 16742, published by the German standards body, which sets out tolerance groups and a scheme for arriving at the appropriate one. Citing a standard and its class is what makes a tolerance requirement mean the same thing to every bidder.
- Whether a dimension is formed entirely within one half of the tool or spans the parting line, this is the single most consequential distinction in molded tolerancing, and section 08 covers why.
- Surface finish by class, and which surfaces it applies to. The SPI finish standard is the common reference, and it addresses appearance and texture rather than dimensions.
- Cosmetic requirements and their boundaries: which surfaces are visible in the assembly, what level of blemish is acceptable, and where witness marks may and may not appear.
- Acceptable locations for gates, ejector pins and parting lines, or at least the surfaces where they are not acceptable. Molders will place these for processing reasons unless told otherwise, and they leave visible marks.
- Assembly context: what the part mates with, and a model or drawing of the mating parts if you have them.
Formats
STEP is the standard neutral 3D exchange format and is what most molders ask for. Include a 2D drawing as a PDF, because it is the file everyone can open and the one that reaches the toolroom and the inspection bench. Explicitly state which document governs when the model and the drawing disagree.
04. Design for the process, because this is what cannot change later
Six characteristics determine whether a part molds well. They are worth understanding before the RFQ, because a molder reviewing your design will raise them and it is cheaper to have considered them first.
- Uniform wall thickness. Plastic shrinks as it cools, and thick sections cool more slowly than thin ones, so variation in wall thickness produces sink marks, voids, and warp. Where a thick section is unavoidable, coring it out is usually better than accepting it.
- Draft. Faces parallel to the direction the part is ejected will drag on the steel. Draft angle allows the part to release, and textured surfaces need more of it than smooth ones because the texture itself has to clear.
- Ribs and bosses rather than bulk. Stiffness comes more from geometry than from material, and a ribbed thin wall outperforms a thick one in cycle time, material cost, and dimensional stability.
- Undercuts. Any feature that prevents the part from lifting straight out requires a side action, a lifter, or a collapsible core, all of which add tool cost, cycle time, and maintenance. Sometimes the feature is worth it and sometimes redesigning it out is worth more.
- Gate location, which determines how the material fills, where knit lines form, where flow fronts meet, and where the part warps. It is a processing decision with both cosmetic and structural consequences, so it should be discussed rather than silently delegated.
- Sharp internal corners, which concentrate stress in the part and are a common origin of cracking in service.
Steel safe, and why it changes how you should design
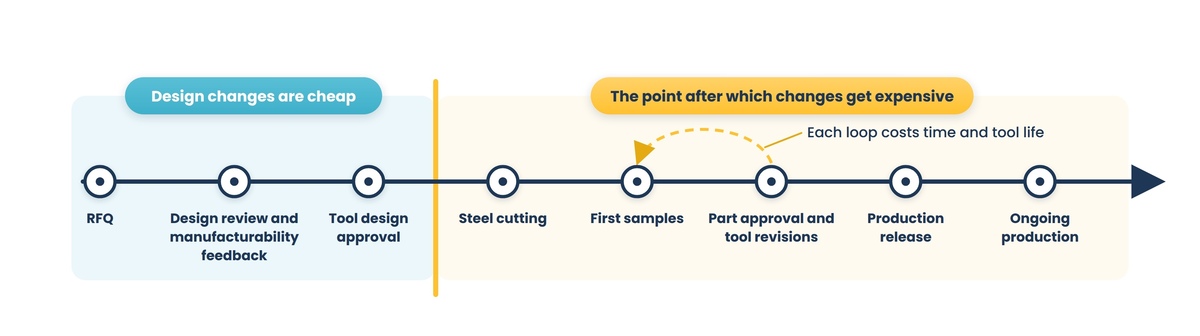
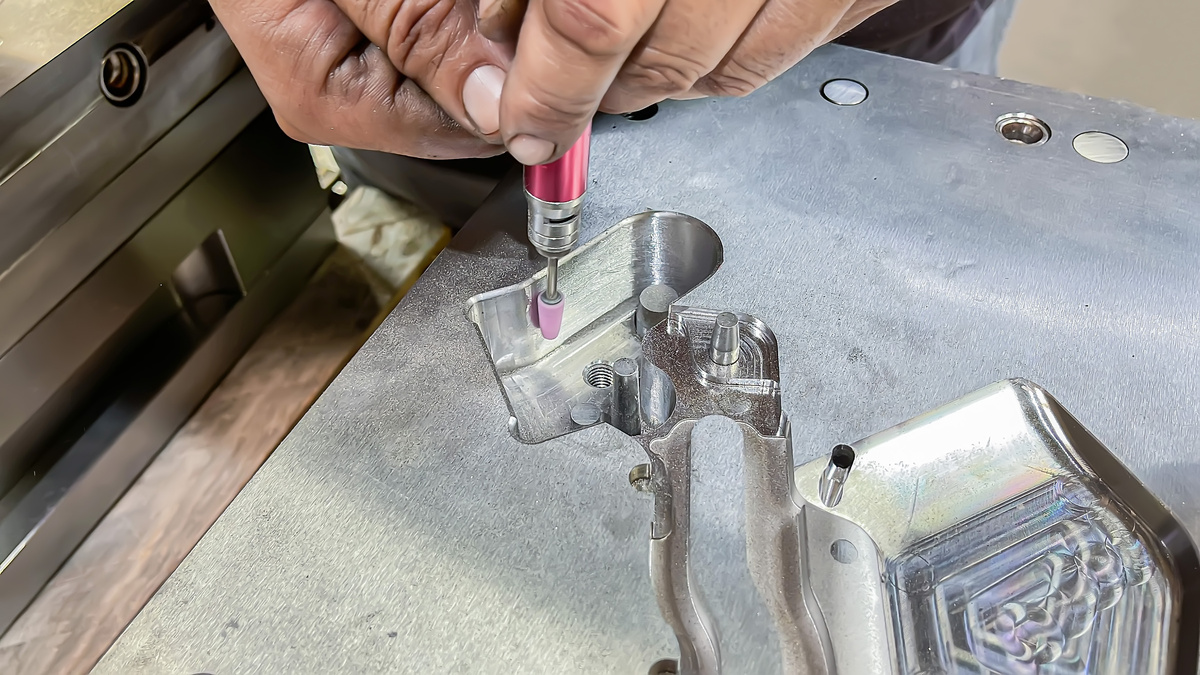
The most useful habit in this category follows from an asymmetry that is unusually severe in molding. Removing steel from a mold makes the plastic feature larger; adding steel back to make the feature smaller is difficult and sometimes requires a welded insert or a new component. So a mold is built: steel safe; features that may need to grow are cut small, and material is removed after the first samples, once real parts have been measured.
For a buyer, this has two practical consequences. Where you are unsure of a dimension, say so and ask for it to be built steel safe rather than to nominal, because that keeps the adjustment cheap. And when a molder proposes a steel-safe condition on a feature, they are not hedging; they are preserving your ability to correct it later.
05. Resin
Name the grade, not the family
Polypropylene is not a specification. A resin callout needs the polymer, the specific grade and its supplier, any filler and its loading, the additive package, and how color is achieved. Two grades of the same polymer can differ in flow, shrinkage, stiffness, impact behavior, and cycle time, and these differences can be large enough to affect both the part and the tool.
Shrinkage is the reason this matters in tooling. A mold is cut larger than the finished part by a factor that depends on the resin, and semi-crystalline materials generally shrink more than amorphous ones and shrink differently along and across the flow direction. That factor is chosen when the tool is designed. Changing to a resin with different shrinkage after the tool is cut can put the part out of tolerance, with no way to correct it except by modifying the steel.

What to state
- Polymer, grade and supplier, or the properties the grade must meet if you want the molder to propose one.
- Filler type and loading. Glass and mineral fills change stiffness and shrinkage, and abrasive fills wear tooling, which is a reason to specify a harder mold class.
- Additives: ultraviolet stabilizer, flame retardant, antistatic, lubricant, and any that are required by the application rather than optional.
- Color, and how it is achieved: pre-compounded resin, masterbatch let down at the press, or natural. Pre-compounded gives the most consistent color; masterbatch is cheaper and more flexible. Say which, and state whether a color match against a physical standard is required.
- Regrind: whether reprocessed material may be used at all, and if so at what maximum percentage. Silence here is frequently read as permission.
- Any certification the material must carry for the application, and any restriction on substitution.
Where you have latitude, say so
A molder who regularly runs a particular grade, holds it in stock, and knows how it behaves in their presses will quote it better than an equivalent grade they would have to buy in and learn about. If your requirement is a set of properties rather than a specific grade, specify the properties and invite proposals. If a customer specification or a qualification fixes the grade, say that too, so nobody wastes time proposing alternatives.
Controlling the resin after launch
Specifying the grade is the start. The failures that arrive in year three are rarely a bad original selection. They are a grade discontinued, an alternate plant, a masterbatch changed, regrind creeping upward, moisture uncontrolled, or a comparable material substituted during a shortage. Six controls belong in the agreement rather than in a conversation later.
- An approved material list and an explicit substitution rule. State whether a substitute requires written approval, samples, dimensional review, color approval or revalidation, and who has authority to grant it. Silence here is read as permission during a shortage.
- Lot traceability, and whether certificates of analysis or conformance are required and retained. Where the application is regulated or safety related, establish who holds the evidence and for how long.
- Drying and moisture control. Hygroscopic resins molded wet lose properties and produce defects that look like process problems and get chased as process problems. Establish the drying requirement, how moisture is verified, and what happens when a dryer fails mid-run.
- Regrind, defined precisely. Internal clean runner regrind and purchased recycled material are different things. State which is permitted, at what maximum percentage, how it is metered rather than estimated, and whether critical, cosmetic, or regulated parts prohibit it entirely.
- Color approval against a physical standard rather than a color name, with the viewing conditions stated, and a defined route for reapproval when the resin or masterbatch changes.
- Process change notification. Establish what the molder must tell you about before it happens: resin, grade, plant, masterbatch, regrind rate, press, or a significant process parameter change.
06. The tool you are actually buying
Mold classification
The Plastics Industry Association, formerly the Society of the Plastics Industry, maintains a classification that sorts injection molds into five classes by construction and expected life. It is the most useful single thing a buyer can put in a molding RFQ, because it converts a vague expectation about tool quality into a comparable requirement.
- Class 101 is built for the highest-volume production, with hardened steel throughout, meeting the most demanding requirements for hardness, guided ejection, plated water lines, and corrosion protection. It is the most expensive class and is intended for programs running into the millions of cycles.
- Class 102 is a high-volume tool without some of the features required for Class 101, suited to programs approaching, but not exceeding, roughly a million cycles, and commonly chosen when tolerances are tight, or the material is abrasive.
- Class 103 is the medium volume workhorse, built for programs up to around half a million cycles, and is one of the most commonly built classes.
- Class 104 is a low-volume tool for limited production in non-abrasive materials, typically up to 100,000 cycles.
- Class 105 is a prototype tool, intended for a very small number of parts.
Two cautions. The classification describes the durability and construction of the tool rather than the quality of the parts it produces, so that a well-maintained lower class tool can make excellent parts within its intended life. And the classes are a framework rather than a rigid specification, so molders adapt them to specific requirements. Naming a class tells a supplier what you expect; agreeing the construction details within it is still a conversation.
Cavitation
The number of cavities is an economic decision, not a technical one. More cavities produce more parts per cycle and cost more in tool and in press tonnage. The right number depends on annual volume, cycle time, the press sizes the molder runs, and how much capital you want to commit before the forecast is proven.
Ask for cavitation options rather than a single proposal. A supplier quoting a four-cavity tool and a single-cavity tool for the same part shows you where the economics lie, and the break-even between them indicates the volume risk you are carrying.
Runner system
The material feeding each cavity travels through a runner. In a cold runner tool, that material solidifies with the part and is removed afterward, becoming scrap or regrind. In a hot runner tool, the material is kept molten and stays in the tool, which reduces scrap and can shorten the cycle by removing the runner from what has to cool and be ejected. The cost is a more complex and more expensive tool with heated components, temperature control, more to maintain, and more to go wrong; color changes and thermally sensitive resins are both harder to manage in one. The effect on cycle time is not reliably one-directional, so ask for an estimate for your part rather than assuming it. The material yield benefit is the reliable one, which is why hot runners tend to earn their cost at higher volumes and on expensive resins, but not at low volumes on commodity material.
What the tooling quote must itemize
- Mold class, and the steel specified for cavities and cores.
- Number of cavities and whether the tool is a family tool that produces multiple parts in a single cycle.
- Runner type and, for hot runners, the number of drops and the control system.
- Side actions, lifters, or collapsible cores required by the geometry, since these are where tool cost is concentrated.
- Texture and finish work, and whether texturing is quoted or excluded.
- The number of sample rounds included, and what happens if more are required.
- What tool modifications are included after first samples, and what would be chargeable.
- Tooling lead time, stated separately from part lead time, and what it depends on.
07. Tool ownership, maintenance and transfer
This section covers the questions that surface years after the order, when they are hardest to resolve. Settle them in writing at the outset.
Ownership
Establish in writing who owns the tool, and do not assume that paying for it settles the question. Payment does not by itself establish title, the right to remove the tool, or any entitlement to the design data, and what it does establish varies by contract and by jurisdiction. All three have to be stated separately, because ownership of a tool you cannot take away, or can take away without the drawings that would let anyone else run it, is not much use.
Storage and insurance
The tool will live at the molder for years. Agree who insures it, against what, and what happens to it if the molder ceases trading, is acquired, or the site closes. Agree also whether the tool may be moved between the molder's own sites without your consent.
Maintenance
Molds wear. Agree who performs preventive maintenance and at what interval, whether it is measured in cycles or in time, who pays for it, and what records are kept. Then agree the harder question: who pays for repair when something breaks, and how normal wear is distinguished from damage. A tool that has run without documented maintenance for several years is a liability for whoever owns it.
Transfer
Programs move. Establish in advance what happens when yours does: what notice is required, what condition the tool will be released in, what it will cost to release, whether outstanding invoices can be set against it, and what design and process documentation comes with it. Ask specifically whether the molder will provide the tool drawings and the process parameters, because a tool arriving at a new molder without them takes far longer to bring back into production.
End of life
Agree what happens when the tool reaches the end of its life or the program ends: who decides, who disposes of it, and whether you want it back. This is a small clause that prevents a large argument.
08. Tolerance, finish and cosmetics
The distinction that governs molded tolerance
A dimension formed entirely within one half of the mold can be held far more tightly than one that spans the parting line or crosses a side action, because the second depends on how precisely the tool halves close and align every cycle. This is the molded equivalent of tolerance stack-up across bends in sheet metal, and it is the thing most often missed by buyers fluent in machined parts.
The practical instruction is to identify which of your critical dimensions are formed in one half and which are not, and to tolerate them differently. Where a critical dimension currently spans the parting line, ask whether the parting line can be moved so that it does not. That question, asked before the tool is designed, is worth more than any tolerance negotiation afterward. How much tighter depends on the geometry, the resin, the tool, the press, and how the dimension is measured, so treat the distinction as the thing that tells you which dimensions to interrogate rather than as a number you can apply.
Finish is not a tolerance
The SPI finish standard classifies surface appearance, running from high polish through paper and stone finishes to blasted textures. It describes how a surface looks and feels. It does not control dimensions, and a drawing that specifies a finish class without naming a dimensional tolerance standard has specified appearance only. Cite both.
Texture also interacts with geometry: a textured surface needs more draft than a smooth one to release, and adding texture late can therefore require a geometry change as well as a tooling operation.
Cosmetic requirements
Molded parts carry witness marks from the process itself: a gate vestige where material entered, ejector pin marks where the part was pushed out, parting line witness where the halves met, and possible knit lines where flow fronts converged. None of these are defects unless the drawing says so, and all of them can be positioned if the requirement is stated. Define which surfaces are cosmetic, what is acceptable on them, and where marks may fall. Where appearance is critical, agree a physical acceptance sample rather than a written description.
09. Issuing the RFQ and reading what comes back
Invite manufacturability feedback explicitly
Say in the inquiry that the design is open, and ask each bidder to identify changes that would reduce tool costs, cycle time, or risk without affecting function. Molders see these constantly and usually stay quiet, because volunteering changes to a customer's part is presumptuous unless invited. The quality of what comes back tells you something real: a molder returning three specific, reasoned suggestions has engineered your part, while one returning only a price has run it through a quoting system. Read it for what it is, though. It is evidence about the applications and sales engineering team, not about the plant that will run the part for the next five years.
Run the question period in the open
Set dates for questions and answers, and circulate every question and answer to every bidder. A question one molder asks reveals an ambiguity all of them are dealing with, and answering privately means they are quoting against different information.
What a complete quote contains
- Tooling price, itemized as in section 06, stated separately from piece price.
- Piece price at the quantity requested and at defined break quantities.
- The resin grade quoted and the assumed material price basis, since resin prices move and you need to know whether the quote is fixed or indexed.
- Estimated cycle time and the press size assumed, which together explain the piece price.
- Tooling lead time and part lead time, separately.
- Number of sample rounds included and the cost of a further round.
- Any exceptions, assumptions, or manufacturability concerns the molder is registering.
- Quote validity, which for molding covers both the tool and the resin basis.
The commercial terms that make quotes comparable
Tooling and piece price are the visible numbers, and they are not sufficient to compare bids. Ask for these in the quotation rather than discovering them at the first purchase order.
- Packaging: what the parts ship in, whether it is returnable, and who owns and replaces it.
- Freight terms and delivery point, since an apparently lower ex-works piece price is not lower delivered.
- Minimum order quantity, and any minimum run length dictated by setup economics.
- Scrap and yield assumptions built into the piece price, including startup scrap and color change losses, and who bears them.
- The resin price mechanism: whether the price is fixed, indexed to a published resin index, or reviewed on a stated interval, and what notice applies to a change.
- Payment milestones on the tooling, and what each one entitles you to.
- Notice period for any price change, and what evidence supports one.
Compare on program cost, not piece price
A molder proposing a higher class tool with more cavities will show a higher tooling number and a lower piece price. Another proposing a lighter tool shows the reverse. Neither is better until you put them on the same basis: total cost across the volume you will actually buy, with tooling amortized over it, plus the cost of replacing a tool that does not last through the program. That model is necessary but still insufficient, because it assumes that the forecast, cycle time, yield, uptime, and press availability all behave as quoted. Those assumptions are exactly where a low piece price collapses. Four things belong in the comparison alongside it.
- Yield and scrap in full: runner scrap where the tool is a cold runner, startup scrap on every run, color change losses, cavity imbalance, and cosmetic rejects. Ask whether the quoted price assumes regrind is recovered and reused, because that assumption changes the number.
- Effective rather than nominal cavitation. A four-cavity tool that routinely runs with two cavities blocked is not an economic four-cavity model. Ask what causes cavities to be taken out of service, how often it happens on comparable tools, and how quickly they come back.
- Qualification cost and time on your side, not just the molder's stated sampling charge. First article, dimensional studies, your own testing, assembly trials, any regulatory testing, and the schedule cost of one more correction loop.
- Transferability. A low tooling number can conceal a proprietary hot runner platform, nonstandard components, an undocumented process window, or an offshore tool build with no local support. Each of those is a cost that appears only when you try to move the program.
Warning signs
- A tooling price with no itemization, which cannot be compared and hides what was excluded.
- No mold class stated, or a class that does not match the volume in the inquiry.
- No manufacturability comments on a part with obvious molding difficulties.
- Texture, sampling rounds, or tool modifications quoted as excluded without saying what they would cost.
- A tool life quoted as a cycle count, with no definition of what "end of life" means or how cycles are counted.
- Reluctance to name the press the part will run on, or to say which work is subcontracted.
Take This to Your Next Conversation
Fifteen questions drawn from this guide. The first several are for the molder, the last few for your own team before the inquiry goes out.
- What mold class are you quoting, and what volume and program life does that class support?
- What steel are the cavities and cores made of, and does my resin or filler change that recommendation?
- How many cavities have you quoted, and what would the tooling and piece price be at one step above and below that?
- Cold runner or hot runner, and at my volume and resin, which one actually pays?
- Which features in my part are driving tool cost, and which could be changed without affecting function?
- Which of my critical dimensions are formed in one half of the tool, and which span the parting line or a side action?
- What shrinkage factor have you assumed, and what happens to my dimensions if the resin grade changes later?
- Where will the gate, ejector pins, and parting line fall, and are any of those on a surface I have called cosmetic?
- How many sample rounds are included, and what does a further round cost in money and in weeks?
- Which tool modifications after first samples are included, and which would be chargeable?
- Who owns the tool, what does that entitle me to remove, and what documentation comes with it?
- Who maintains it, at what interval, who pays for wear and tear versus damage, and what records will I get?
- If I move this program, what are the notice, cost, and condition under which the tool is released?
- Before issuing: is our volume forecast a plan or a hope, and have we said which in the inquiry?
- Before issuing: have we stated the resin grade, the tolerance standard and class, and which surfaces are cosmetic?
About this guide
Written by the Industrial Web Search editorial team. This guidance is general and does not replace engineering advice for a specific part or program. The classification and tolerance standards referenced here are revised periodically, and their current editions are the authority. The mold classification is a framework that molders adapt to specific requirements rather than a rigid specification. Material certification and regulatory requirements for plastics vary by application, by market, and by jurisdiction. Verify every specification against the current edition of the governing standard and against the resin supplier's current datasheet, and confirm manufacturability with the molder before a design is frozen.